

During this series, we will use ĚěŃÄşŁ˝ÇÉçÇř to build a Data-Centric pipeline to debug and fix a model trained with the NVIDIA TAO Toolkit.
‍
. We demystify the NVIDIA ecosystem and define a Data-Centric pipeline based on a model trained with the NVIDIA TAO framework.
‍
Part 2 (current). Using the ĚěŃÄşŁ˝ÇÉçÇř API, we show you how to upload a dataset and a model to the ĚěŃÄşŁ˝ÇÉçÇř platform.
‍
Part 3. We identify failures in our model due to data issues, fix these failures and improve our model’s performance with the fixed dataset.
‍
Table of Contents
- Recap from Part 1
- Getting an access token
- Uploading our dataset
- Uploading our model
- Manually uploading a dataset/model
- What’s next
‍
1. Recap from Part 1
In the of this series we focused on three main things:
- We introduced a blueprint for building a Data-Centric pipeline.
- We broke down the NVIDIA TAO Toolkit and several of the moving parts of the NVIDIA ecosystem.
- We briefly introduced the .
‍
Before continuing, make sure that you have the following pre-requisites:
- A trained model on the we introduced in Part 1. You can either adventure yourself with the NVIDIA TAO Toolkit using this or download a trained model .
- Both the annotations of your dataset and the predictions of your model are expected to be in  — If you opt for (already in COCO format) instead of training one by yourself, you can disregard this step.
- One provider to store your data with the appropriate configuration (click on the links to configure your data storage provider): , or .
- A ĚěŃÄşŁ˝ÇÉçÇř account.
‍
⚠️ ĚěŃÄşŁ˝ÇÉçÇř’ advanced features, including the API, are available for premium users only. However, to make the most out of this series, Section 5 describes how you can upload a dataset/model on the freemium version of ĚěŃÄşŁ˝ÇÉçÇř. Please, sign up for a sandbox account .
‍
2. Getting an access token
To obtain an access token, first generate your API keys (see Figure 1).
‍

‍
The API keys will serve you to retrieve an , as shown on the code below.
‍
đź’ˇ Hint: contains examples in other programming languages different from Python (e.g., Node, Go, PHP, Ruby, etc).
‍
‍
A successful response is shown below:
‍
‍
Save the value of access_token , we’ll use it during the rest of the article.
‍
⚠️ Be aware that the access token has an expiration time of 3,600 seconds or 60 minutes — follow the same procedure to obtain a new one, if required.
‍
đź’ˇHint: Our following code examples might appear verbose to the trained eye, and in fact they are: for this series, we aim to be as explicit as possible!
‍
3. Uploading our dataset to ĚěŃÄşŁ˝ÇÉçÇř
⚠️️ For the code examples in Section 3 and 4:
- We use as data storage provider during this post. For more information, follow this .
- Replace
credentials.valueandazure_uriwith your own values. - Use your
access_tokenin the headers.
‍
3.1 Images & Annotations Ingestion
We assume you have configured your data storage provider as mentioned on Section 1. If you haven’t, detailed instructions of how to do the setup Azure, can be found .
‍
Let’s push our dataset to ĚěŃÄşŁ˝ÇÉçÇř! 🚀
- Uploading images:
‍
- Uploading annotations:
‍
- Ingesting the images and the annotations into ĚěŃÄşŁ˝ÇÉçÇř:
‍
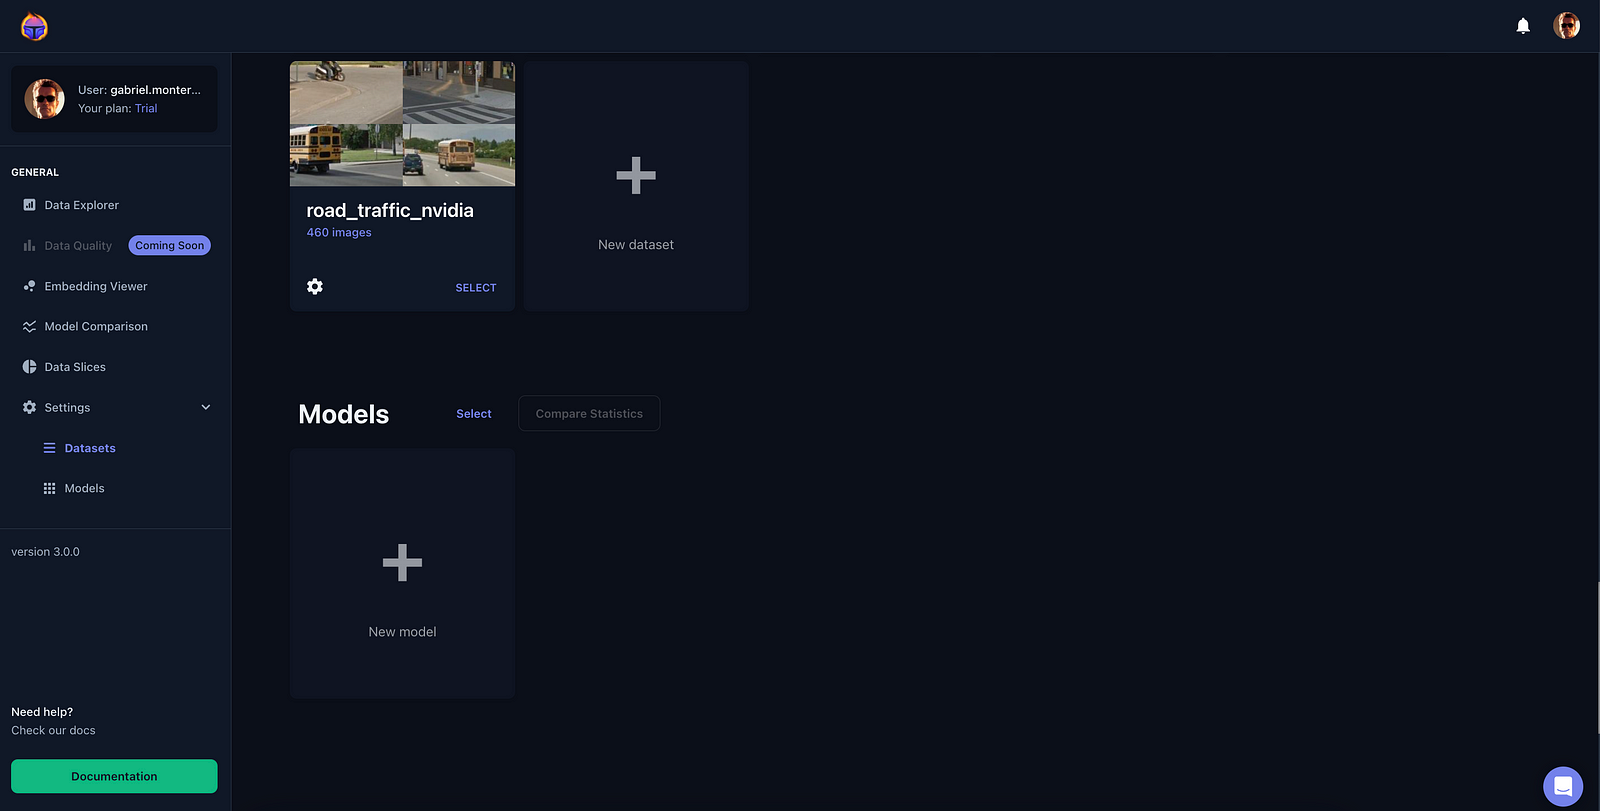
Voila! You will now see your data on the platform! (see Figure 2).
‍
4. Uploading our model to ĚěŃÄşŁ˝ÇÉçÇř
4.1 Model Predictions Ingestion
Next, let’s upload our model to ĚěŃÄşŁ˝ÇÉçÇř.
- Creating a model:
‍
- Uploading model predictions:
‍
- Ingesting model predictions:
‍
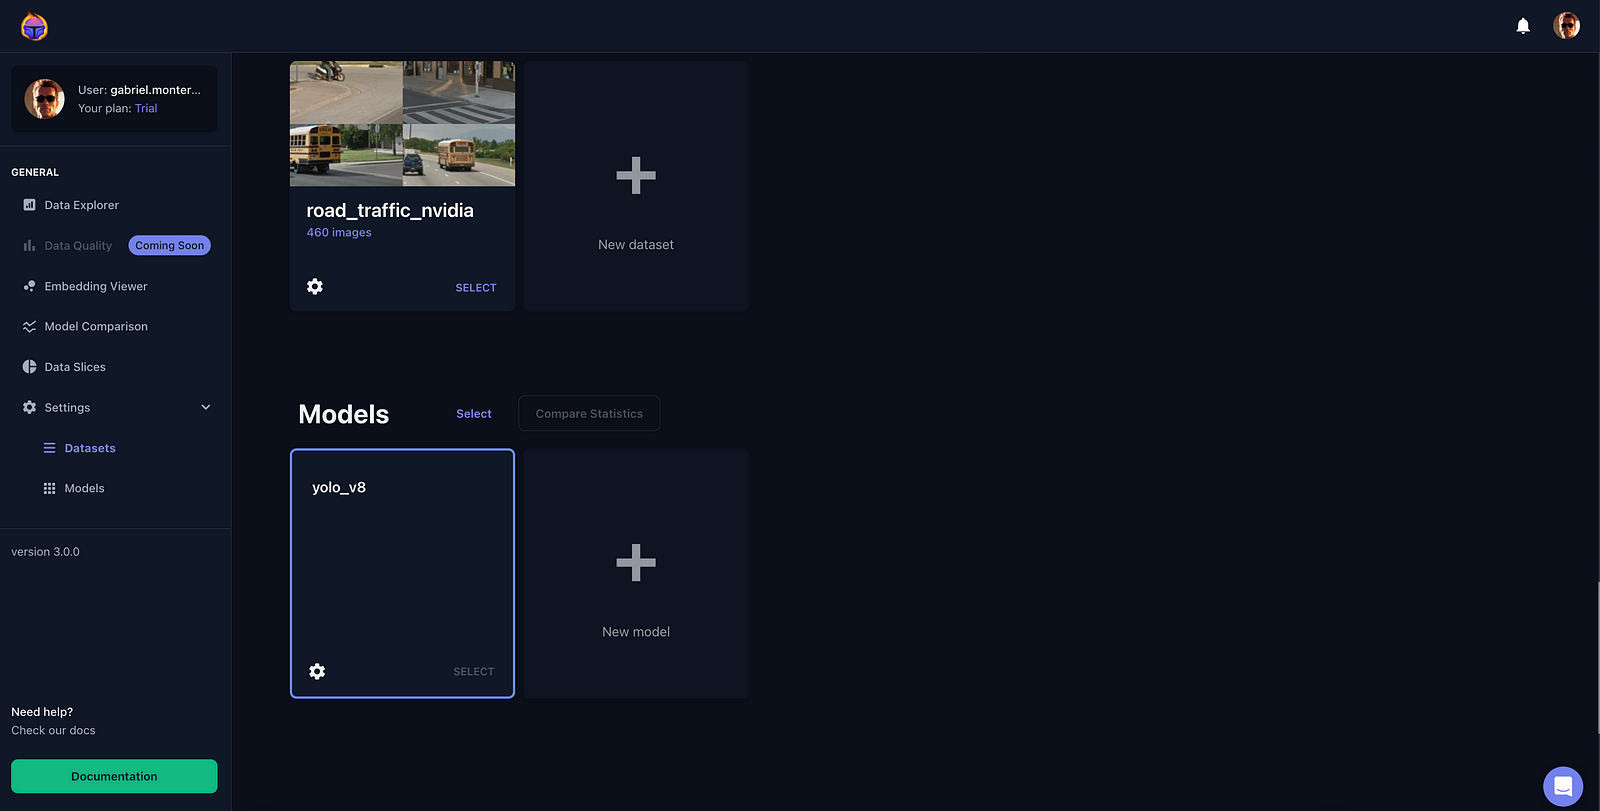
After completing this procedure, this time you will also see a model on your ĚěŃÄşŁ˝ÇÉçÇř dashboard (see Figure 3).
You are all set! ⛳️
‍
5. Manually uploading a dataset/model
In case you don’t have access to the ĚěŃÄşŁ˝ÇÉçÇř API, you can quickly upload your dataset/model on your sandbox account.
‍
Before we start:
- If you haven’t signed up for a free sandbox account, please .
- The trained NVIDIA TAO model, that you can download , contains all what you need in the required format.
‍
This step by step walk-through show you can you . This other guide show you how to .
‍
6. What’s next
We have defined a Data-Centric pipeline to detect data failures and improve performance on a trained NVIDIA TAO model (Part 1).
‍
In Part 2, we have set up a data storage provider (Azure for this article) to interact with the ĚěŃÄşŁ˝ÇÉçÇř platform. In addition, we have learned how to actually use the ĚěŃÄşŁ˝ÇÉçÇř API to ingest a dataset into our ĚěŃÄşŁ˝ÇÉçÇř account.
‍
In Part 3, we will delve into finding model failures as well as fixing these errors following a Data-Centric pipeline.
‍
Stay tuned for Part 3! đź’™
‍
Authors: Jose Gabriel Islas Montero, Dmitry Kazhdan.
‍
If you would like to know more about ĚěŃÄşŁ˝ÇÉçÇř, sign up for a .

Lorem ipsum dolor sit amet
Lorem ipsum dolor sit amet


